FactSage 5.5 Installation
- Show Me
|
(Revised January 2007)
FactSage
5.5 is a thermochemical
software and database package that runs under Microsoft Windows 98, NT, Millenium,
2000 and XP. It requires a minimum Pentium 200 with
at least 128 MB RAM and 1 GB free disk space.
In order to install the complete
FactSage 5.5 package on a new PC you must first
If FactSage 5.0 (or 5.1, 5.2, etc.)
is already installed on the PC then ignore item #1 and
go to #2.
Before installing FactSage 5.0 on
the PC you must
- quit all other Windows applications
- make sure the PC clock is set
to the correct date and time.
1.0 Install FactSage 5.0 (April 2001) - Show Me
|
If FactSage 5.0 (or 5.1, 5.2, etc.)
is already installed on the PC then ignore this section and
go to #2.
Important
message for network managers:
The FactSage 5.0 installation CD must be in a local disk drive of the
PC. It can not be in a network drive or copied to a remote network hard disk
- in such a case the FactSage installation will fail.
When FactSage is installed for the first time on a PC that runs under Windows XP
(or other NT-based systems) you must have full administrator
privileges (for company PCs controlled and maintained by the
IT personnel you may need to consult the IT Manager).
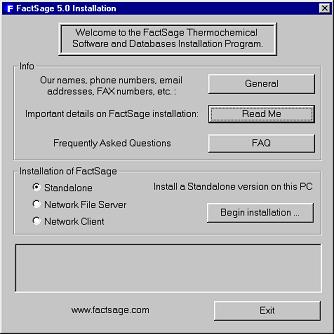 |
If you are running the FactSage 5.5 Installation CD and you see the
FactSage 5.0 Installation frame then click on
Install FactSage 5.0 (April 2001)
or
run the program Install
located in the \FactSage directory (folder) of the original installation CD:
CD-ROM\FactSage\Install.exe
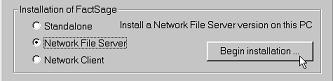
<--- You will be presented with the installation menu you see here.
You must decide if you are going to install FactSage as a Standalone
single user (the PC has a dongle), or as part of a Network (the
server PC has a password).
For
a Network version you must install the Network File Server
on one of the PCs - all other PCs will be Network Clients.
Note,
you can not use the PC to install FactSage on another PC or on
a remote disk. |
-
Standalone
- single user - the complete FactSage package will be installed on the
PC. The program can not be accessed by other PCs. The Standalone PC requires
a security key (dongle) attached to its printer or USB port.
-
Network
File Server - all the FactSage files and databases will be installed
on the PC in a public directory (folder) that is 'share read-only' to other PCs
on the network. The files can be read and copied by other PCs (Network Clients)
but there will be no write operations to the server. The are two ways of
installing the network server version:
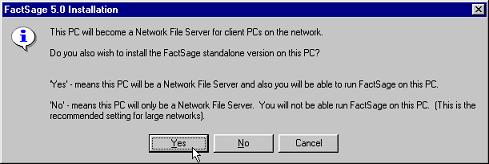
- Network File
Server and run FactSage - select this option if you also want to
run FactSage on the server PC. This is useful in a small local area
network of several PCs where someone is installing the server version
on his PC and he also wants to do FactSage calculations.
- Network File
Server only - select this option for large networks where the server
PC is a file server only. You will not be able to do FactSage calculations
on the server PC.
-
Network
Client - the PC will access FactSage programs and databases already
installed on another PC (Network File Server).
1.1 Standalone Version - Show Me
|
Standalone
- single user
- the complete FactSage package will be installed on the PC. The program can
not be accessed by other PCs. The Standalone PC requires a security key (dongle)
attached to its printer or USB port.
| |
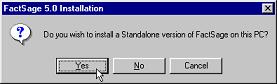
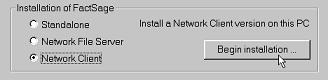
Select
option 'Standalone' and then Click on 'Begin installation ...':
|
| |
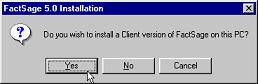
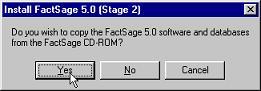
Click on 'Yes' to begin installation. |
| |
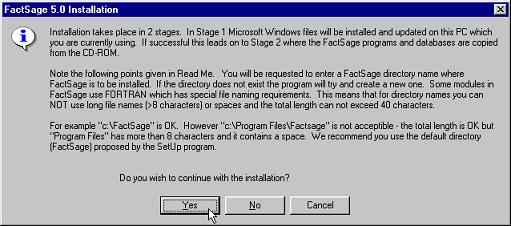
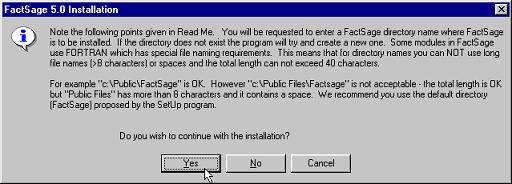
You are advised that installation takes place in 2
stages.
Also
you are advised about the name of the FactSage directory (folder).
Click
on 'Yes' to continue installation. |
| |
You are advised about
rebooting the PC.
Click on 'Yes' to continue
installation. |
| |
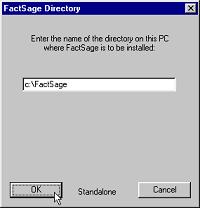
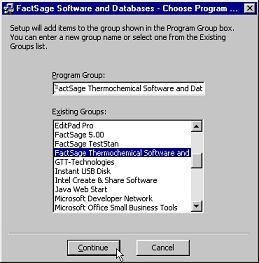
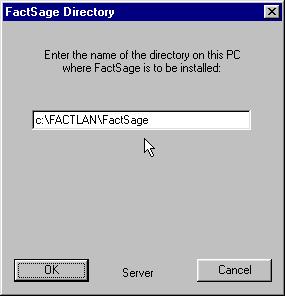
You
must enter the name of the directory (folder) on the PC where FactSage is to be
installed. The directory must reside on a local hard disk (typically the
c:\ disk drive). If the directory does not exist then a new one will be
created if the name is valid. It is recommended that you use the default
directory name 'c:\FactSage'.
Do
NOT use long file names and do NOT use blank spaces. For example you
can not use
C:\Program Files\FactSage
because
'Program Files' is a long file name (it is has more than 8 characters).
It also has a blank space. A name such as
c:\MyApps\Thermo\FactSage
is
OK if the directory 'c:\MyApps\Thermo\' already exists. |
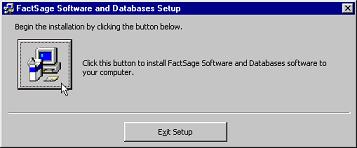
If the directory name is
accepted then the Windows setup program will be copied from the CD-ROM and then
automatically executed. Simply follow the instructions (again you will be requested
to supply the FactSage directory name - use the default setting).
Installation takes place in 2 stages:
Stage 1: Installation of the Microsoft Windows files
| |
During
installation you may get a message of the type 'Setup can not continue
since some files are out of date ...' followed by a request to reboot
the PC. In such a case after rebooting the PC you must click on 'Begin
installation ...' and run this installation all over again - this is important!
|
| |
During
installation you may be informed that the program is not responding and
you must end the task. In such a case after rebooting the PC you must
click on 'Begin installation ...' and run this installation all over again
- this is important! |
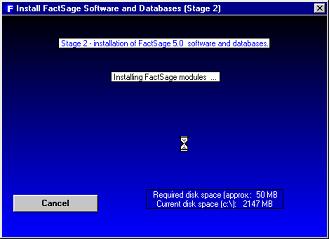
Stage 2: Installation of FactSage 5.0 Software and Databases:
50 MB free
disk space is required to install FactSage 5.0. However you will use up
to 1 GB by the time the complete FactSage 5.5 package has been
installed. |
|
A
parallel port dongle goes into the printer port, a USB dongle goes into
the USB port.
 |
Depending upon when your original FactSage 5.0 was prepared, it may be
necessary to install more recent MemoHASP drivers (i.e. files that activate
the dongle) - this is especially true for PCs running under Windows XP.
For example you may get error messages of the type
"Failed to Start Alladin Device Driver - Failed to start
a service in the Service Control Manager Database ...."
or "User has no access to registry - 0x2010000 0x0 0x0".
For more details click on Dongles and Drivers.
|
1.2. Network File
Server Version
|
Network
File Server -
all the FactSage files and databases will be installed on the PC in a public
directory (folder) that is 'share read-only' to other PCs on the network. The files can
be read and copied by other PCs (Network Clients) but there will be no write
operations to the server. The PC has a password.
If the FactSage installation CD is given to the Network Manager who is unfamiliar with
FactSage software and databases, we recommend that the Network Manager
works with someone who has already installed FactSage as a standalone version,
and successfully accessed the various modules and databases.
In a small
network of several PCs the Network File Server can be any PC. It is important
that the PC has lots of free disk space (for future updates) and that it is
reliable. Speed and RAM are not important.
|
 |
Select
option 'Network File Server' and then Click on 'Begin installation ...':
|
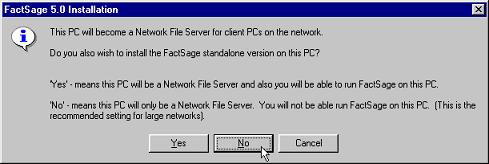
| |
Click on 'Yes' to begin installation. |
There are two options when installing the server version:
Server Option i) Network File
Server and run FactSage
| |
Click
on Yes if you also want to run FactSage on the server PC. This
is useful in a small local area network of several PCs where you want
to install the server version on your PC and also want to do FactSage
calculations. For large Networks this is NOT recommended. |
| |
You
are advised about the name of the FactSage directory and about rebooting
the PC.
Click
on 'Yes' to continue installation. |
Now you must enter the name of the public directory on this
PC where FactSage is to be installed - see below
|
Server Option ii) Network
File Server only
 |
Click
on No if you do want to run FactSage on the server PC. Select this
option for large networks where the server PC is a file server only. |
| |
You
are advised about the name of the public FactSage directory.
Click
on 'Yes' to begin installation.
|
Now you must enter the name of the
public directory on the PC where FactSage is to be installed.
|
|
The
directory must reside on a local hard disk (typically the c:\ disk drive).
If the directory does not exist then a new one will be created if the
name is valid. It is recommended that you use the directory name 'FactSage'.
Do
NOT use long file names and do NOT use blank spaces. For example do
NOT use
'C:\Public Apps\FactSage'
('Public Apps' is a long file name because it is has more than 8 characters.
It also has a blank space.) |
In the
above example the directory 'c:\FactLan\' must already exist. The program
will automatically create the sub directory \FactSage if necessary. Make sure
the FactSage directory ('c:\FactLan\FactSage') is 'share read-only' to
the other PCs on the network.
If you have selected Server Option i) the rest of the installation
is similar to the Standalone Version - click here.
After installation of FactSage 5.0
on the Server PC you need a server computer password which you obtain
from us:
-
If
you have selected Server Option i) then
run FactSage on the Server and click on the 'Tools > Upgrading ...> Computer
password ...' menu bar for information.
-
If
you have selected Server Option ii)
you can not run FactSage on the server. In this case simply locate the text
file 'id.txt' you will find in the server FactSage directory, edit it (add
your name and e-mail) and then e-mail it to us.
In either case more information is also
given in the file 'server.txt' that you will also find in the server FactSage
directory.
After FactSage 5.0 is installed on the Server, you are now ready to
1.3 Network Client Version
|
Important
message for network managers:
The FactSage 5.0 installation CD must be in a local disk drive of the
PC. It can not be in a network drive or copied to a remote network hard disk
- in such a case the FactSage installation will fail. There are no short cuts
for Network Client installations - the CD must be physically installed in a
local disk drive of the Client PC.
Network Client
- the PC will access and copy FactSage programs and databases already installed
on another PC (Network File Server).
| |
Select
option 'Network Client' and then Click on 'Begin installation...'
|
|
|
Click on 'Yes' to continue installation. |
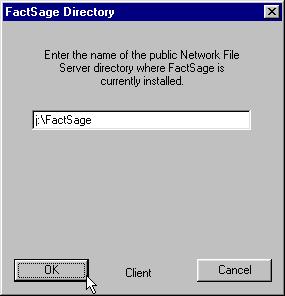
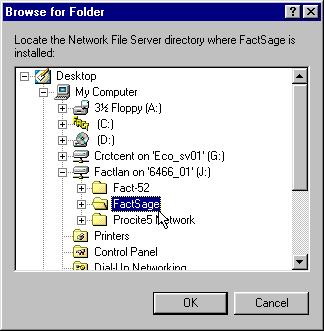
Now you must enter the path to the Network
File Server directory where FactSage is already installed.
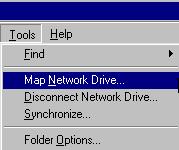
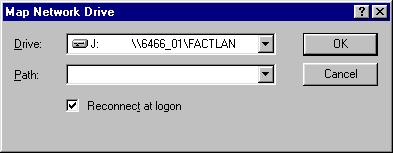
On the Client PC it may be necessary
to map the network drive (click on Tools in the Windows Explorer) and
assign a letter (here it is "J") to the public folder where FactSage resides.
|
|
If you have difficulty entering the correct
path you may need to run your Windows Explorer in order to verify the
path. |
| |
After
the path is accepted by the installation program you are then advised
that installation takes place in 2 stages.
Also you are
advised about the name of the FactSage directory.
Click on 'Yes' to continue installation. |
The rest of the installallation
is similar to the Standalone Version - click here.
2. Install/Update the Full FactSage 5.5 Package (January 2007)
- Show Me
|
Run the program FactSage55.exe located on the FactSage 5.5 Update CD
(the program normally loads itself when the disk is placed in the CD drive).
Click on Open ReadMe.htm for details on what is updated in FactSage 5.5 and
other information.
The FactSage
5.5 Update program enables you to upgrade FactSage 5.0 (or 5.1, 5.2, etc.) software,
documentation and databases to FactSage 5.5.
You can
upgrade a FactSage Standalone Version (the PC has a dongle) or a Network Server
Version (the server PC has a password). In the case of a network it is
only necessary to upgrade the server PC - do not
upgrade the Network Client Versions.
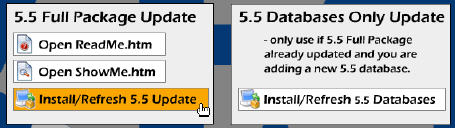
| |
To install the Full FactSage 5.5 Package click on Install/Refresh 5.5 Update
(The Databases Only Update option is used to save time if you have already
loaded the 5.5 Full Package and you are adding a new database.
In such a case we will send you a new file Profiles.ini with instructions.)
|
|
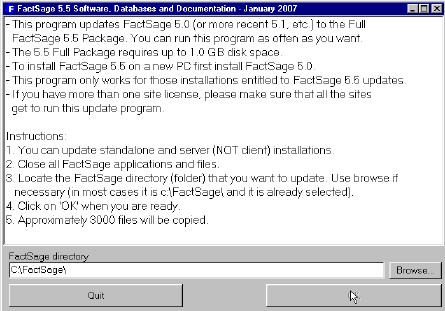
|
You must locate on the PC
the FactSage directory (folder) that you wish to update - click on 'Browse' (see below)
if necessary.
If you have more than one FactSage installation on your PC, for example a standalone and a
client installation, make sure you select the correct directory, i.e. in this
case select the standalone directory.
Click on 'OK'
when ready.
Approximately 3000 files will be copied. |
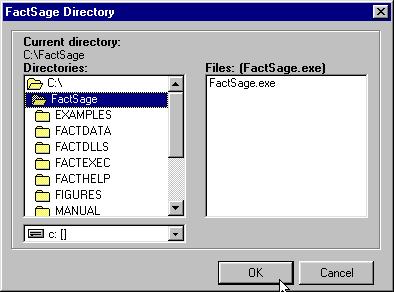
| |
If necessary click on 'Browse' to locate the FactSage folder. |
In order
to activate a Standalone version of FactSage, a dongle (also known as
a hardware lock or security key) must be attached to the to the printer port
or USB port of the PC. It is also necessary to install the latest MemoHASP drivers
(i.e. files that activate the dongle) - this is especially true with PCs running
under Windows XP where the drivers installed in the original FactSage 5.0 package
must be refreshed with more recent ones.
We have
used MemoHASP dongles supplied by Aladdin
Knowledge Systems for over 10 years. FactSage supports two types of dongles:
- a robust white parallel
port device (6cm x 4cm x 1.5 cm) that is attached to the printer port
- a small dark colored
USB device (5 cm x 1.5 cm x 0.75 cm) that is inserted into a USB port
Apart from
the fact that the USB device has a red light that glows when installed correctly,
we have not detected any differences between the two devices. Should you experience
difficulties first make sure that the dongle is firmly attached to the PC.
|
(Windows XP requires minimum 4.99. Windows Vista requires minimum 4.102.)
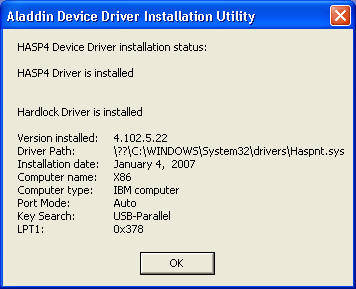 |
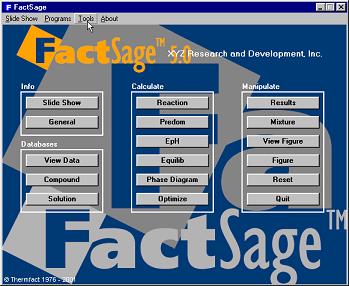
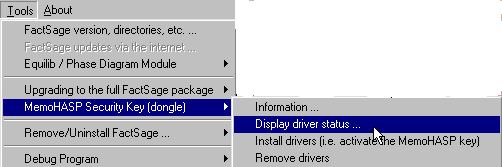
After
connecting the dongle to the PC make sure that you have installed the
latest MemoHASP drivers (i.e. files that activate the dongle). Run FactSage
5.5 and in the FactSage main menu at the top left click on 'Tools > MemoHASP
.. > Display driver status' and make sure the Version installed is 4.99
(or higher) for Windows XP, or 4.102 (or higher) for Windows Vista. |
| |
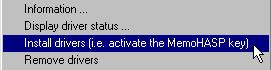
To
install (or refresh) the drivers, run FactSage 5.5 click on 'Tools > MemoHASP
.. > Install drivers ..' If your PC runs under Windows NT (2000, XP) it
may be necessary to first log on as the 'Administrator' - make sure that you have
full administrator privileges. |
With Windows
XP failure to install Drivers 4.99 (or more recent) may result in error
messages of the type:
- "Failed to Start Alladin Device Driver - Failed to start
a service in the Service Control Manager Database ...."
- "User has no access
to registry - 0x2010000 0x0 0x0"
- ... etc.
With Windows
Vista failure to install Drivers 4.102 (or more recent) may result in similar error
messages.
Download Drivers:
FactSage 5.5 is supplied with Drivers 4.102. You can also
download the latest MemoHASP drivers from the internet - click on
HASP
Device Driver Downloads Download
the file HASP4_driver_cmdline.zip. Decompress it and copy the contents to the \MemoHASP
sub-directory of your FactSage directory (this replaces Hinstall.exe, etc.). Then
run FactSage and click on 'Tools > MemoHASP ... > Install drivers ...'
4. Common Problems - Windows XP, Windows Vista, Network, Databases
|
The most common problems installing and running FactSage are
often associated with the following topics:
- 1. Windows XP, Windows Vista
When FactSage is installed for the first time on a PC
that runs under Windows XP (or other NT-based systems) problems that arise
are generally related to the 'Administrator Privileges' and/or the drivers
for the dongle (MemoHASP security key).
To
install FactSage on a PC you must have full administrator
privileges (for company PCs controlled and maintained by the
IT personnel, this may be difficult to obtain). For a stand-alone version
to access the dongle it is necessary to install the latest drivers after
the FactSage 5.5 update has been installed - see Dongles
and Drivers. With Windows XP failure to install Drivers 4.99 (or more recent) may result
in error messages of the type:
- "Failed to Start
Alladin Device Driver - Failed to start a service in the Service Control
Manager Database ...."
- "User has no access
to registry - 0x2010000 0x0 0x0"
With
Windows Vista failure to install Drivers 4.102 (or more recent) may result
in similar error messages.
After successful installation the Administrator can run FactSage however a
Regular User may not be able to access FactSage
and its folder, or may see error messages such as
- Run-time error '75': Path/File access error.
In such a case the Administrator must give the Regular User permission to access and change files in the
FactSage directory.
Run FactSage 5.5 (or more recent) and click on the menu bar 'Tools > Windows XP > Permit regular users access to FactSage ...'
and FactSage will try to permit regular users access to the FactSage folder and its sub-folders.
If this does not work then ask an XP expert for help.
For example access to the FactSage directory can be controlled via the CACLS command.
- 2. Installing FactSage
5.0 and the FactSage Updates on the Network
Problems often occur when the FactSage installation
or Update CD is given to the Network Manager who is unfamiliar with
FactSage software and databases.
In such a case we recommend that the Network Manager
works with someone who has already installed FactSage as a standalone version,
and successfully accessed the various modules and databases.
IT
specialists may take short cuts when installing new software. Making virtual
copies of the FactSage Installation CD in order to speed up installations
on FactSage Client PCs is a common error and can lead to a great loss in
time and energy. There are no short cuts for installing FactSage 5.0 on
a Client PC - the installation CD must be physically installed in
a local disk drive of the Client PC.
For
University installations, if the Network Manager is a graduate student it
is important that the Professor keeps track of the original installation
package, updates and dongles as well as, of course, the graduate student.
- 3. New Databases
It may be necessary
to work with the Network Manager especially when installing new databases.
For large installations, Network Managers routinely backup all network files.
Manually copying directories and files to the FactSage directories from
backups can create problems and cause FactSage to go into SetUp (i.e. demonstration)
mode.
There
is a 'learning curve' on how to use the FactSage databases.
After the new databases have been installed, you should consult the information
(in the FactSage Main Menu click on 'Documentation')
which decribes all the databases,
how to select phases, suppress duplicates, etc.
At the bottom of the Documentation is the section
List of database files stored in \FACTDATA that explains how to
include/exclude databases in a calculation.
[www.FactSage.com]
[F*A*C*T] [GTT]